
Word is 147 trailers and 289 campers made the 2015 CRA a smashing success!

I was able to meet in person friends I'd made on the Tearjerkers and Teardrops and Tiny Travel Trailers forums as well as new friends who don't actively participate on either forum. Some I got so caught up having fun talking with I forgot to take pictures of their trailers (like Jessy and Bob Henry) for this blog post :(
Though there were many activities available at the State Park, I came to see the trailers. For a northerner (like me) it was really hot and terribly humid but I slogged around (albeit at a snail's pace) to see as many trailers and to meet as many people as I could.

The Glampette was there with her new domed awning and mosquito net sidewalls that I sewed together last Monday. The new awning is a huge improvement over the cotton table cloth one I made in 2013 because it's made with water resistant outdoor canvas, the domed shape will keep water from pooling in the center if it does rain, and I can stand upright beneath it.
The mosquito net side walls are self-explanatory. They cover all three open sides as well as frame the doorway to create a bug-proof enclosure. I also brought along two Thermacell® mosquito repellent devices and some lemon eucalyptus oil bug spray for my arms and legs. Between the three methods they did the trick keeping me safe from bug bites at base camp.
I'll also be creating a velcro strip with rip-stop nylon sidewalls for privacy and to shield my doorway from wind and rain. I'll make a DIY tutorial once it's done to show you how the whole thing goes together. The basic concept was from a forum thread written by Doug Hodder where he outlined how to create the domed top. Once I bookmarked the thread it only took almost two years for me to acquire a sewing machine capable of sewing though 7 layers of canvas and one layer of velcro :P

And that's Fred's Northern Lite Traveler which you may remember from The Flirty Blog back when we attended the Camp-Inn Camp-Out in Mausten, Wisconsin and camped Michigan's UP in the fall of 2013. While we couldn't share a spot at this particular park we did get sites that were end to end so we could camp together.

These were two stunning trailers. The Wild Goose (top) and Cabin Car (bottom) are both vintage reproductions built by their respective owners. Their quality and craftsmanship were self evident.
The Wild Goose is one of the few teardrop trailers that converts into a standy when you lift the tailgate. You can actually walk into it and stand up indoors to dress and cook.
The Cabin Car combines a huge bed with an actual sit shower and small bath tub! I'll admit, it was so hot out, when I saw the little tub I wanted to fill it with cold water and a few bags of ice and just sit in it all day long. LOL

If vintage isn't your taste there were also modern trailers both small and large.
The myPod is a tiny bed on wheels. There isn't a galley kitchen so you'll need to set up your own camp kitchen once you arrive at your destination.
The TAB and Alto are larger teardrop shaped trailers but aren't technically teardrops because the rear tailgates don't open to outdoor galley kitchens. You can stand up in them and they are quite spacious so they're a popular choice for those who want a little more room for comfort. The Alto in particular has both a shower and fixed toilet for those who don't want to make do with a porta potty.

The BoatTrailer is just that a boat+trailer that come as one nifty set. At the rally was an actual vintage trailer combined with a modern, reproduction boat as the original boat had been lost somewhere in time. The rear storage area is larger than it looks in photos and can be converted to have protruding shelves to create an easy to access kitchen/prep area. If this could be your dream trailer it's now easier than ever to acquire one since the American Dream Trailer company recently began reproducing the BoatTrailer on the West Coast using an actual vintage BoatTrailer to create their molds from.

Two of my favorite trailers there were these small, vintage, canned hams. I would be happy to have either a 10' Shasta or Scotty if I ever travel the country for extended periods. They have a bed, table, seating, indoor kitchen, and even room for a porta potty. If you get creative you can set up a shower station as needed. I've seen people do so in articles and videos I've read and watched online.
The vintage canned hams are where I got the idea of adding a rope and pole awning to The Glampette.

And these were two of the most unusual trailers I spotted at the CRA. The teardrop above was painted with chalkboard paint on its exterior so creative types could color and draw on the exterior walls or you could use them as a message board. So clever!
The lower is a Vardo-style trailer that includes a bed towards the front and seating and counter space just inside the doorway. There's even a composting toilet that fits beneath the bed with plenty of room for storing other gear.

If you need a trailer that is extremely lightweight and/or budget conscious a "foamie" could be your best choice to be able to have a trailer sooner vs. later. Made of rigid foam board and covered with canvas they can be a unique entry level trailer. They just go to show if there's a will there's a way!

While some go all out decorating (ahem, like me) others add more subtle fun touches that allow their personalities to shine through. From "Life is Good," to "Family Guy," to "Tweety Bird" I saw several trailers with cute graphics added to their exteriors.

I was very happy to see in-person the trailers of two builders I'd talked to on the phone back when I first began my search for a trailer of my own. Frank from Vintage Technologies (above) and Dan from Whetzel Trace Travel Trailers (below and now retired) were in attendance. If you've ever been on my Pinterest trailer board you'll have seen the tiny Whetzeldorf I shared there. Sadly, both trailers were too heavy for my car to tow which is what led me to doing more and more research until I decided to design (and have built) The Glampette.

Of all the trailers at the rally I have to say that Joe's all aluminum construction, 400 lb, tiny motorcycle teardrops were the ones that really caught my eye. Though longer than The Glampette they were definitely shorter and (I think) also a foot more narrow.

Joe said he didn't design the trailer at the outset but rather figured it out as he went along which, to me, just made his work all the more impressive.
His craftsmanship was impeccable and I was floored by his ingenuity. Space was utilized to maximum efficiency and each trailer was equipped with an awning, sound system, two rear storage compartments, a swiveling light post, a nice prep shelf, a long horn beneath the rear bumper, and decorative touches like the metal window awnings and window boxes of flowers.

He's not a member of either trailer forum which is a darn shame because other builders would definitely be inspired by his work.

One of the things I love most about the tiny trailer community is the can-do spirit everyone who seems to be a part of it shares. Whether purchasing a finished trailer and customizing it with our own touches or designing your own build from scratch, restoring a vintage trailer, or modeling a new trailer to build from a classic vintage profile there's room for all and something for everyone. Two great examples are the trailers above.
The top is a home-built, Benroy-style trailer. It's clean, classic, and shows how to put a mosquito tent to good use over the rear end of the trailer. Greg came all the way down from Connecticut to attend the rally! His campsite also highlights why it's nice when people keep their campsites tidy for photo ops :)
The lower was a father-daughter build. I have to say one of my regrets was briefly saying hello to Lauren Saturday evening and telling her I hoped to make it back Sunday before she left for a tour but dang, there is just never enough time at the rallies to see every trailer up close! I hope we are both at another gathering again in the future so I can meet her and get a closer look inside her beautiful trailer.

Aside from wishing I had a gorgeous classic car to tow my trailer with, two other things that inspired me at the CRA were to add a colored light beneath my trailer to gently illuminate my camping area in the evenings before going to bed like the American Wanderer teardrop above, and to finally add a solar panel to the roof of The Glampette as she's already wired for one and has roof-top mounting tabs to the rear of her vent/fan.

I'd be remiss to not mention that this was an incredibly dog friendly event. Since losing Kitai I always welcome the opportunity to pet other people's dogs. At the CRA there were dogs of all shapes and sizes including these two gorgeous huskies (who loved to be petted).

For this trip I was just happy to glamp up coffee time each morning with my new, collapsible, silicon, Xpot and Espro French coffee press. I'll be reviewing each of them along with the tasty, raw coffee beans I ordered and roasted myself from Mojo Roast online.
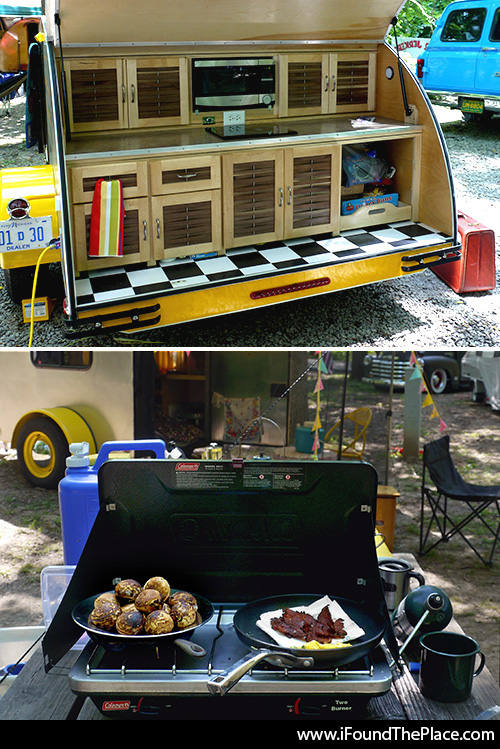
While some trailer kitchens look like incredible, miniature versions of home kitchens with microwaves, induction burners, small refrigerators, toaster ovens, and Keurig coffee makers, Fred and I go classic setting up his Coleman stove on a picnic table and cooking there.
Part of my fun was finally using the vintage, Danish, cast iron, Aebelskiver pan my friend Dana found for me at an estate sale in California. It was a little rusty, dirty, and sticky so I had to clean and re-season it.
Before we left Michigan I gave it a test run on the gas kitchen stove to see how the Aebelskiver (aka Ebelskiver or as Fred calls them "Eagle Poppers") would turn out. I discovered the pan doesn't heat as evenly as the non-stick aluminum Ebelskiver pan I started with.

But I'll be bringing the cast iron pan camping from now on. It was great for keeping the finished Ebelskiver warm while I cooked the rest of breakfast. I just popped them onto a metal camping plate then set that on top of the still very hot cast iron pan and they were still warm when we sat down to eat.
These were filled with an apple-pear filling spiced with nutmeg and cinnamon. I'd made the filling before we left home so it was easy to simply add a spoonful to each well as I made breakfast. I also pre-measured all of the dry ingredients and put them in a small container so it was like using a box mixed made from scratch.

Speaking of cast iron I was honored to part of the Dutch Oven cast iron cooking seminar hosted each year by Bob Henry. What began as a group of 17 attendees quickly grew to more than 34! Bob had asked me to be his "Vanna White" assistant handing him all of the different items he would be describing to the audience. Since I know my way around cooking utensils I said sure. Turned out it was really easy because Bob was very organized. We sailed through the presentation.
The science behind Dutch oven cooking is to place hot coals both below and on the lid of the pot which replicates an oven heating it from top to bottom. It's basically baking without an oven.

To kick things off he made a "Cooler Clean-out Casserole" which is where you take all of the leftover food in your cooler Sunday morning, toss in some grated cheese, pour in some scrambled eggs and bake the whole mess, um I mean delicious combination, in a Dutch oven. His included sausage, meat, potatoes, and beans.
His volunteer taste tester gave it a thumbs up after his first bite!

Not only did I learn how to cook with a Dutch oven, I was really excited that Bob showed how to make a DIY charcoal chimney! You can make one as small as whatever sized cans you use. I need a teeny tiny one to light three briquets at a time for my 5"x5" cast iron hibachi!
The license plate windscreen is another idea he's shared on the TnTTT forum before. You can prop it up around your stove to break the wind or around your Dutch oven to hold in the heat.
IMO Bob Henry is THE most resourceful and frugal member of the TnTTT forum.

Every rally has a huge Saturday night potluck dinner. It's always a lot of fun but sometimes can take a while to make it up to the food. At the CRA they tried something new this year: Two long rows of tables with four rows of hungry campers all heading down the lines at the same time. It worked out great. It cut the start to finish time from the first to last campers in line dramatically from previous years.
There were lots of other activities some I tried and some I missed out on. Apparently there was a hoola-hoop contest, karaoke, some type of giant underwear race (lol), a builder's seminar, a backing up seminar, a silent auction, a Dutch oven cooking contest, outdoor movies, a group breakfast provided by our hosts, and more. You can participate as much or as little as you'd like but you better come prepared to be social because meeting people and making new friends is what these rallies are all about.
Each year the directors of the CRA ask for suggestions to improve the event the following year. From a participant's standpoint there doesn't seem to be a whole lot of room for improvement. The event was very well organized. I guess the only suggestion I'd make is if name tags could include forum avatars and forum user names as that's how I would quickly and easily recognize most people. If I come again I'll even volunteer to make them ;)
Thank you so much to Kurt, all of the Chapter Directors, and volunteers. Your hard work and effort to make this a great even was obvious at every turn and very much appreciated.
For any of you who (like me) are unfamiliar with high humidity here are some tips you might find useful to make your camping experience as enjoyable as possible.
- Only camp where electricity is available at the campsite. See the following three reasons why.
- AC. If your trailer doesn't have one built in but you have room in your car and can afford a small unit, bring a small air conditioner that you have rigged up to blow cold air in through a trailer window or vent. Small pet AC units designed for dog houses work perfectly for a teardrop. You'll be especially glad to have one if you want to take a nap or rest comfortably midday.
- If you don't have an air conditioner bring an electric fan of any type, especially for when you're sitting outdoors. If you don't have a built in vent/fan an additional small fan in your trailer also comes in handy. Though it cooled down every evening some nights took longer than others.
- I will invest in a portable ice maker if I ever camp somewhere with a similar climate again. A batch of ice in 15 minutes and up to 33 lbs of ice production per day. . . Um, yeah. Sign me up. I was running to the local grocery each day to buy bags of ice for our coolers, rubbing myself down with ice cubes throughout the day, then using the ice cold water I drained from the coolers each night to bathe in. LOL The last night I didn't even bother going in the trailer. I just left my clothes on, sat on my metal chair outside my trailer inside my mosquito tent, and drenched myself basically pouring the water over me while scrubbing with a wet washcloth. I didn't use soap because it wasn't needed. It wasn't quite Flashdance style, but you get the picture.
- Even though the campground had showers they lacked adequate ventilation so even taking a cold shower wasn't as refreshing as it should have been. By the time you turned off the water, got dressed, and gathered up your belongings you would already be hot and sweating before you'd even make it outside. Though it would be an extra expense and packing I would bring a solar shower and shower tent in the future. I am planning on making nylon, privacy sidewalls for my awning so all I have to do is figure out the best way to elevate the shower bag above my awning and find a suitable plastic container/tub to stand in to catch all of the water so as not to muddy up the campsite or allow soapy water to run off onto the ground. I'll also attach four connection points to hang a shower curtain from the awning ceiling to minimize splashing.
- I will pack a large ice pack of some type so on hot days I can keep it filled and lay it on any part of me at any given moment. Anything to help lower your core temperature will make you more comfortable even if only temporarily.
- At this particular park it is worth noting that there were fewer mosquitos towards the center of Loop A than out along the tree line. We didn't see any mosquitos or biting insects during the daytime where we were parked but when I attended the Dutch oven seminar which was up near the thicker treed area I was bitten several times at 11:00 AM.
