HOME

Thursday, November 29, 2012

My trailer's getting real now!

Today I ordered the windows for my tiny 4'x6' travel trailer! Here are a few design updates for those of you following along.

I've come up with a new paint design because in changing the rounded shape of the bottom corners of the cabin to straight edges we lost half of the curves that made the trailer have a "cute" shape imo. A big, happy, yellow circle seems like a good way to replace them bringing back some fun and femininity to the design!


While I wanted tiny windows I opted slightly larger for safety issues. Turns out the windows should be big enough for emergency egress, meaning if I needed to create an exit instead of using the door, the windows should be large enough for me to push out the screen and leave, or for emergency personal to be able to climb or reach in to get me out. Yeah. Been there. Done that.

I also decided against having a large window on the door. Instead I'll have a peep hole, just like what you'd use on your front door in case I want to see who's outside.


One of the biggest design challenges Fred (my builder in Michigan) threw at me was the placement of the license plate. In California, trailers have the same size plates as cars. They have to be horizontally mounted and have to have a light on them for night time visibility. They also have to be at least 12" but no more than 60" from the ground. Ideally we didn't want to put the plate on the door because it creates a whole lot of work (and potential problems) to have to run the light wiring from the frame and through the door. Finally, after a lot of thinking, I came up with the idea pictured above: Put the plate on the door but the light on the frame. Perfect!


Another design challenge was to make enough room for Kitai to be able to comfortably fit in the cabin with me at night. We could cuddle up together in the sleeping chute but it would be cozy.


At one point Fred suggested I should add cabinets along the top of the trailer on the front end to help add weight for balance. It dawned on me that if I add a cabinet there, I could eliminate a cabin from the sidewall. . .


Which creates a nice little nook for Kitai to spill into at night. I think we'll fit perfectly!

The transparent area is the overhead shelf.

While adding floor space I didn't want to lose counter space so I decided I could use folding shelf brackets and create a table that will be attached to the side of the last cabinet.


When in transit I'll still be relocating two of the cabinets to the opposite side for better balance.

I've also decided to wait to add a solar panel until I'm really certain I need one. I think the best way to determine that is to wait until I have the trailer and take it out on a few trips. Depending how long the battery lasts I'll know if a solar panel is a good idea or not. For now we're designing space for the panel on the roof and a channel to run the wiring if needed. Time will tell.

That's my latest update for now. Fred will begin the build very soon. I'm so excited I can't wait for April to get here!


To follow the entire build thread from beginning to end just click on the "Trailer - Build" category on the side bar or CLICK HERE.

To view all of my trailer gear and decorating posts CLICK HERE.


Tuesday, November 27, 2012

A porta potty for camping, natural disasters, and renovations

"How can you stay somewhere without a bathroom?" That's almost always the first question people ask when I tell them about my teardrop trailer.

But I'm in the know. I conducted extensive online research to be able to have some creature comforts in my tiny trailer. What I learned is that not only are porta potties modernized, they can be odor proof, flush like a household toilet, and are good for much more than camping.

If, in an earthquake, flood, ice storm, or any type of natural disaster, you lose water service for more than a day, where will you go to the bathroom? What about when you're having your bathroom remodeled and lose access to your toilet for several days or weeks? In an emergency you can only use a toilet so many times without flushing before you'll clog it up when your water service is restored. Not to mention the emanating odors will be less than pleasant.

Luggable Loo on the left, a Thetford Porta Potti® on the right.


Years ago after the Loma Prieta earthquake I lost power for about a week and water for around three days. Not a pleasant situation. After that I purchased what is known as a Luggable Loo. It's a bucket with a toilet seat and lid that snap over the top. You fill the bottom with water and enzymes that break everything down over time. That was 23 years ago. Now there are porta potties that are designed to replicate a much more civilized bathroom experience.


In my trailer I'll have a Thetford brand Porta Potti®. They have several models to choose from. They're compact, easy to clean, leak proof, and odor free. When I travel it seemed like a good idea to have one if I'm in the middle of nowhere or in the middle of the night when I don't feel it's safe to walk alone in the dark to use a public restroom at a campground or rv park.

As soon as I saw the Thetford brand online I was sold.

Here's how they work. The toilet is comprised of two sections, the upper section includes a fresh water tank, the lid, seat, bowl, and flusher.


The bottom includes the lever you pull to open the trap door to the lower black water (waste) tank and the emptying spout and lid.

It's that easy. If you're using it for urine only it's literally no muss no fuss. When you flush the toilet fresh water shoots out of a small nozzle along the top rear corner of the bowl, circles, and rinses the entire bowl clean. If you use it for bowel movements there's a nifty "Happy Bowl" liner product to keep the bowl clean. They've literally thought of everything.


You do need to add 4 ounces of water and an ounce of enzymes to the black water tank before you begin using the toilet. And you have to use special toilet paper the enzymes are able to quickly dissolve to prevent the emptying spout from clogging.

When it's time to empty the tank you simply swing the spout away from the base, screw off the cap, and pour the liquified contents into an RV dump station or a toilet. When you do it's not going to as icky as you're probably thinking it will be. The enzymes will have done their job and the great design of the toilet will make the whole process surprisingly simple and clean.

Be sure to view the "New and Improved" models on the Thetford website.

I purchased the 320P model at a local (brick and mortar) Camping World store but you can also view or buy them at Camping World online. The 320P can hold 4 gallons (33 flushes) of fresh water and 3.2 gallons of waste. It's a step up from their base model so there's also an indicator to let you know when it's time to empty the black water tank.

I really think everyone should have one of these that they keep at home just for emergencies. In case you face an extended period of time without access to plumbing to empty the black water tank just having a few extra 5 gallon buckets with lids handy in your garage will give you somewhere to store the contents until plumbing is restored and you can dispose of them in a convenient manner. Hopefully you'll never need to use it. But if you do, I'm pretty sure you'll be thankful you were prepared.


ETA: I did make a cute cozy for the porta potty in my travel trailer. . .


Once Fred built my countertop and shelves for me I ended up tucking it in beneath the counter. On the rare occasion I need to use it, I think I used it three times on my latest four week trip, I simply fold back the sleeping mattress and pull it out to the main cabin area. It's a perfect and safe solution to not having to leave the safety, and in the winter time warmth, of the trailer in the middle of the night to wander to a public restroom on my own.


To follow the entire build thread from beginning to end just click on the "Trailer - Build" category on the side bar or CLICK HERE.

To view all of my trailer gear and decorating posts CLICK HERE.

Wednesday, November 21, 2012

Guess who hates freshly baked cookies?

Hubby loves chocolate chip cookies. Earlier today I baked him some. He's been asking me to make them for months. Here's the thing, in Hubby's world the worst chocolate chip cookies are warm, soft, freshly baked cookies. Blech! They're terrible! And yet, that's how I make them every time I bake them for him. Yuk!

Three hours later, when they're completely room-temperature cold, he thinks they're delicious. That's after listening to him lament at least once or twice about why does it take so long for chocolate chips to re-harden? Why indeed.


by Pastry Chef Pattie Taan

In the past I've always used the recipe from the Stars Desserts cookbook. But recently the Farmhouse Inn, located in Forestville, CA (between Guerneville and Healdsbug) shared their chocolate chip cookie recipe with the world. So, I thought I'd make them for Hubby. The recipe calls for white, milk, and semi-sweet chocolate chips. But you know hubby. He only likes food made simply, in their most traditional form. So, I only used semi-sweet chips.


The recipe was so easy I didn't even make a photo tutorial for you. Just follow the directions. The only tip I'd add is to flatten the balls of dough just a bit and make sure your oven is plenty hot. Like wait a 10 minutes after the pre-heat cycle has run.

They're crisp on the outside, soft on the inside and very, very delicious. Thanks Farmhouse Inn for sharing your cookie goodness with us :)

Monday, November 19, 2012

Loving foods I used to hate

Have my taste buds changed? Have yours? Have you tried foods you used to hate only to discover they now taste good? In the past week I've tried two foods I used to despise and, shockingly, enjoyed both of them.


The first was P.F. Changs Stir-Fried Eggplant: Chinese eggplant tossed in a spicy vegetarian sauce with chili paste and scallions. It came highly recommended by my mom and I loved it! The eggplant chunks reminded me of the texture of perfectly cooked fish, only even more tender. The flavor? A winner. A sweet and very slightly spicy soy based sauce melded to the eggplant pefectly. All it needs is a bowl of rice to turn this into a really great lunch or dinner.


The second new old food was pancakes. As a kid I loved making them but couldn't stand eating them. I was always a toast or waffles kind of girl. But, the description of these Lemon Ricotta Pancakes with a Fruit Compote caught my eye on my first visit to The Table in Willow Glen.

I didn't order them. I tried the Chilaquiles instead and they were awesome.

A comment by my friend Robert on Facebook that they tasted like lemon pound cake made me go back. They were great. I'd order them again if I had someone to split the order with because I couldn't eat the whole thing by myself.

So this post is just a gentle nudge to try new things. Things you thought you hated. You might end up just as surprised as I was :)

Saturday, November 17, 2012

As the rest of the world mourns the passing of the Twinkie. . .

I'm sad there will be no more Hostess Powder Sugar Donuts with the Raspberry Filling. Actually, I've been in semi-mourning for them for years because I haven't been able to find them in California for a very long time. But when I travel to Washington State I'd spot them here and there. July 2010 was the last time I had them. Guess it's a good thing I took pictures while I could.


When I took these pictures my mom laughed at how much I still loved them. I remember when I was a little kid, around 10 years old, helping her with the dinner dishes and she'd give me some as an extra dessert. I was so short I had to stand on a stool to reach the drainboard to dry the dishes. Maybe that's why they were my favorites. They remind me of having a special bonding moment with my mom :)

My other Hostess favorites were none of their most popular flavors. I loved Snowballs,
Apple Pies, Tiger Tails, and most of all. . . Chocodiles!

Wednesday, November 14, 2012

Loving TechShop again!

Yesterday I did a post about some disappointments and frustrations I'd experienced at the San Jose Tech Shop location. Today I'm happy to report that I feel MUCH better about taking classes and learning there.

TechShop, Mig Welding

This was the step left off the class I'd taken. Learning how to weld two pieces of metal together. When I contacted the store's manager about my experience, he offered to teach me the missing step personally so we set up a time and this morning I went down for 2.5 hours to learn and practice.

He set up two pieces of steel using a big magnet to hold them at a squared, 90ยบ angle.

TechShop, Mig Welding

This was the best weld I did today. I'm learning that welding is about more than just what it looks like as you weld, there's a distinct sound that occurs when you're holding the gun at a proper distance and angle from your project. It's a tuh-tuh-tuh-tuh-tuh kind of noise instead of a snap-crackle-and-pop.

Welding Bead

I also learned how to weld two overlayed pieces of metal together elongating them into a wider single unit.

TechShop, Welding Tools

The tools were all there and fully functioning.

Anyways, I'm very optimistic once again that I will be able to learn to weld. I'll be going back to practice each week from now on. Actually I need to think of a project I can build, if not my trailer something else.

I'm still going to sign up for the wood shop classes and am looking forward to one day taking the powder coating, water jet, and silk screening classes. I'll keep you posted as I move along through the curriculum.


To follow the entire build thread from beginning to end just click on the "Trailer - Build" category on the side bar or CLICK HERE.

To view all of my trailer gear and decorating posts CLICK HERE.


Disclosure: Hubby and I are investors in the San Jose TechShop location and as such have received lifetime memberships. We do still have to pay for classes and any material fees associated with classes or projects.


Tuesday, November 13, 2012

And the build goes on. Without me. Kind of :(

Update: I decided it was best to hire a professional builder for this project. Fred is located in Michigan and began the build over the winter. He sends me pictures every couple of weeks to keep me updated on his progress. You can CLICK HERE to view all posts related to the build.


Recently I'd done a few posts about how I was going to build my own teardrop trailer. I took a MIG Welding Class, then I took a basic metal shop class at the San Jose TechShop location. Sadly, my plans have taken a turn. The news is both bad and good.

ETA 11/14: The day after I published this post I went back to TechShop and received the rest of the class curriculum training. It was scheduled before the publication of this post, not in response to it. My session went so well and the store manager explained to me in more detail how he and his staff will be making even more improvements to the user experience on a day by day basis so I'm happy to report my faith in TechShop is very much restored and I'm hopeful that subsequent classes and practice sessions will go much more smoothly than my first interactions.

My welding gear and a disappointing practice session.

The bad news is that as I gained clarity about what was really going on during my classes and practice session at TechShop, due to frustrations and concerns with how things are currently run at the San Jose location in particular, I've decided not to build my trailer there.

The thing is Hubby and I are friends with the company's founder so I've talked with him on numerous occasions, know his passion, and understand his vision to make it possible for everyday folks (like me) to be able to learn how, with the right equipment and training, to build the things we dream about. But there's a disconnect on a corporate, location, or at the member's level. I suspect it's a bit of all three. All I know is, through my own experiences since early October, the founder's vision is not being fulfilled.

This was the only welding we did in my MIG BSU (Basic Safety & Use) class.

And so, because I was so frustrated and disappointed by the way things were going I realized several things that made me decide to give up on building my trailer. Because the way TechShop is currently staffed and run, not only was I most likely not going to be able to finish my build on time:
  1. There wasn't enough support staff the day I went in for a practice session. This is a statement I make based on the company's commitment that there will always be at least two DC's  (Dream Consultants) available to help members. Yet the day I went there was only one. In the first 40 minutes of my 2 hour session I spent 30 of them waiting for assistance. First 10 minutes to have him check over how I set up the MIG welder, then 20 more for him to help me knock loose the scrap metal I welded to the welding table. I thought there would be someone to watch me practice my first bead but that wasn't going to be possible that day so I had a mini-disaster.  Plus the wire gun wasn't responding to the trigger properly so I gave up for the day rather than sit and wait another 20 minutes or more for additional help.
  2. Worst of all the instructor didn't teach the full class curriculum when I took my MIG BSU welding class. He left out one of the most crucial steps (learning to weld two pieces of metal together) needed for me to move on to the MIG 2 welding class. And he didn't tell us he skipped it. I suspect he didn't teach us because we ran out of time. The reason we ran out of time? Because at the start of the class neither machine was working properly. So during our class one machine was fixed and four of us had to share that one machine. I had to find out on my own weeks later that I didn't learn all that I should have.
  3. In my opinion, the likelihood of being injured during the build process is higher than it should be due to some members leaving equipment in an unsafe condition when they are done working on their projects. Because there isn't enough staff to check the equipment on a frequent enough basis to guarantee that each machine is set up properly before the next person uses it, it creates an unacceptable level of risk. On a sewing machine, ok, I can deal with that. But on the Horizontal Band Saw or a MIG welding machine I'm not willing to take that risk.
  4. It was likely I'd resent my trailer and get an ulcer (at the very least acid reflux) if I tried to work in these conditions for 6 months. 
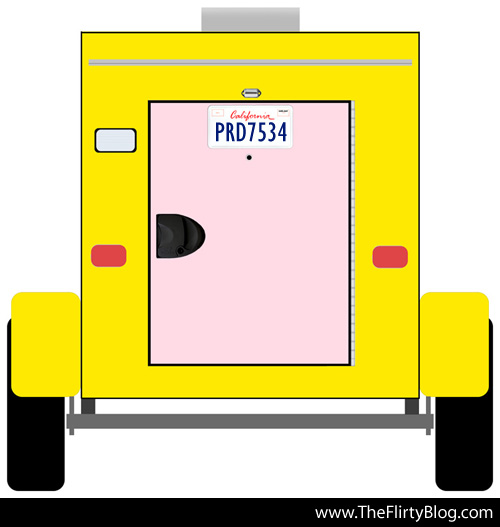
I was so excited to build my trailer at TechShop I was even going to promote them on my rear door to help spread the word about what a great place it is. I was thinking something like this:


Because I won't be building it there anymore it makes me sad that I can't follow through with this idea.

Two weeks ago I spoke with the founder and yesterday I had a long phone conversation with the new'ish store manager of the San Jose location and am hopeful things will improve, at least to some degree. If the problems are a store management issue I trust him they will be resolved. If the problems are stemming from the corporate level, I don't think he can fix them on his own. I guess time will tell. Some issues they were already working on fixing, others he thanked me for bringing to his attention. To his credit he thanked me for putting us through a horribly negative and awkward conversation because management (anywhere) can't address a problem they're unaware of. He's invited me back to personally finish teaching me the class that was left incomplete and is trying to do what he can to restore my faith in the company.

So that's my bad news.

My good news is I've already found someone to hire to build my trailer for me! I met Fred in the Teardrops n' Tiny Travel Trailers forum I joined to ask other builders to critique my design.

Fred's welded trailer frames

I think we clicked because I wanted to weld my own chassis, insulate my trailer and build a less traditional design. He suggested as long as I was learning to weld I should weld the entire cabin frame because it would reduce my trailer's weight and I need to keep my total weight under 1000 lbs to be able to tow it safely with my Acura. Plus that's the way he builds his own trailers.

Fred's insulated, welded frame, Northern Lite Traveler trailer

Most people buy a bolt together chassis and use wood, foam board, or a combination of both to build their teardrop cabin. So when Fred noticed that I was leaning more towards his building style, he popped into the thread and began giving me advice. When I was willing to consider and implement many of his suggestions he gave me even more ideas. Several other members also gave me a lot of advice helping me to improve my overall design.

I reversed the rear to the front for better aerodynamics, moved the entry door to the rear, moved the axle forward and got rid of the dropped storage compartments.

When I realized I no longer wanted to build my trailer at TechShop, I asked Fred if I could hire him to build it for me. He already had my entire design in his head and all the know-how so I figured he was the right man for the job.

So, I'm trading in my build adventure for a road trip adventure. Once Fred is finished with my little flirty trailer I will drive to to pick it up. In MICHIGAN! That's 2355 miles or 37 hours northeast of San Jose.


I've never driven across the country before so this will be my first opportunity to really see a lot of America. The only downside is I told him I might have to wait until spring because I don't want to drive out and tow it back if there's snow on the ground. But who knows, with our crazy weather patterns it could be a dry winter.

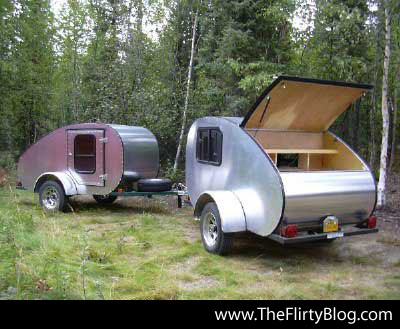
Two of Fred's Trailers

One thing I noticed immediately about Fred's trailers after meeting him in the forum was that he obviously builds to a high level of craftsmanship.

Most trailer builders on the forum document their builds so following his build photo album became an inadvertent qualification process of sorts.

The 5'x8' Northern Lite Traveler weighs in at only 525 pounds!

This one is currently for sale. Yes, that's a Miata pulling a brand new Northern Lite Traveler trailer. It has a sleeping cabin with a mattress, a door on one side, a window on the other, interior shelving and a galley area in the rear. Read more about it HERE.

My original estimate had my trailer (built with steel and wood) weighing in at at least 850 pounds. Once Fred did his magic the dry weight came down to just under 400 lbs! That'll be a huge difference in my gas mileage and ease of towing.


Rather than having the traditional entire rear hatchback that lifts up, as most teardrops do, Fred designed the Northern Lite Traveler's hatch to drop down halfway. This is a great design particularly for tall people who often have to hunch down to fit under the upward swinging, traditional, rear hatch doors.

Birch interior, shelves, and mattress.

If any of my Bay Area friends want a teardrop trailer too I have a great idea! You should buy Fred's Northern Lite Traveler and we can caravan out to Michigan together then camp our way back with our tiny trailers! How fun would that be?

More of Fred's build details

I'll keep you posted on both the trailer build and how things are going at TechShop. I am going to take some wood shop classes because though Fred is building the trailer I'm going to build the interior cabinets on my own because now I've got the building bug and I want to give TechShop a second chance.


To follow the entire build thread from beginning to end just click on the "Trailer - Build" category on the side bar or CLICK HERE.

To view all of my trailer gear and decorating posts CLICK HERE.


Disclosure: Hubby and I are investors in the San Jose TechShop location and as such have received lifetime memberships. We do still have to pay for classes and any material fees associated with classes or projects.

I've also pulled all of my past posts promoting Techshop San Jose for now and will replace them when I feel the company is living up to its mission statement and its commitments to us, the members.

Monday, November 12, 2012

A dessert buffet at Sweet Tooth Confections

Looking for great desserts? Go visit Sweet Tooth Confections, a new'ish bakery in San Jose, CA located just around the corner and down the street from Valley Fair Mall. The company isn't new, it was established in 2009, but their retail location at Bascom and Newhall is.


After attending their "Sweets and Vino Night" retail location launch party, and sampling several (that would be *cough,* five, *cough*) desserts, I can honestly say that they have mastered a standard of baking excellence and quality control that's often inadequately maintained or is completely missing at many other bakeries. Each dessert was so perfectly balanced in flavors, textures, and aesthetic it was a sensory overload of delectable pleasure! While quality control isn't fun to think about, this essential (yet often overlooked) element of the baking and sales process is imperative if you're going to offer desserts that taste as good as they look. Not one of the desserts I tried was disappointing.


My thanks to Head Pastry Chef, and owner, Rachael Myers for inviting me to sample so many of her desserts. These photos don't do justice to the way they tasted.


My favorite? These little Peach Cobbler Pies.


I didn't try them but they were recommended to me and I heard a LOT of people say the Chocolate Chip Cookie Dough Cupcakes were their favorites.


I did try this S'more cupcake. Each bit of a s'more, the graham crackers, chocolate, and toasted marshmallow, was represented. Combine them together and you have an elegant version of the campfire classic. The moistness of the cake was spot on.


Tiny fruit tarts. I had one because fruit is healthy. But it didn't taste healthy, it tasted delicious!


And these petite Lemon Meringue Tarts were Divine! 


There were plenty of cake pops including Gingerbread and Brown Sugar Toffee.


I'm a sucker for caramel so I had to try one of these Caramel Toffee Apple Bites. It tasted as ooey gooey good as it looked with a wedge of fresh apple dipped in the caramel then toffee bits.


And I loved the berry filled pie pops!


Since I don't eat pork I passed on the Chocolate Salted Bacon Cupcakes but everyone who ate them raved about them.


So many bite sized treats and not a big enough stomach. LOL. Clockwise from top left: Red Velvet Cupcakes, Lemon Lavender Cupcakes, Apple Pies, and Banana Peanut Butter Cupcakes.


Strawberry Shortcakes in tall shot glasses would be a showy option for any dessert buffet.


Double Fudge Brownies with drizzled frosting.


And we each received a little bag of Salted Caramel Popcorn to bring home with us. I had mine for breakfast the next morning. It was fantastic.


Sweet Tooth Confections also bakes and decorates elegant wedding cakes.


Here are just a few examples of their work.


Their cakes are sophisticated, artful, and imaginative..


The Sweet Tooth Confections team.


And then I had to draw upon every ounce of willpower I had. At the end of the open house guests were invited to grab a box and fill it with leftover desserts. This was someone else's box. I fought the temptation (since I'd just eaten five desserts) and politely declined. Sometimes I surprise myself with just how much willpower I can muster up.

But I will go back for more. You can keep up to date what's available each day in their retail shop by joining their Facebook page where they post a daily menu.

You'll find the very talented Chef Rachael and her team of bakers and decorators at:

Sweet Tooth Confections - Website
1305 N. Bascom Avenue Suite I
San Jose, California 95128