HOME

Saturday, November 26, 2016

A DIY Faux Weathered Wood Ceiling

My idea for the Tinygami Work Studio is to have the left half of the ceiling bright white as it will be the side I use as a mini photo studio. The walls and ceiling will be plain white and perhaps even part of the floor.

The right side is where my daily work/production area will be. I want it to feel like a private alcove, kind of cozy and comforting, like I'm tucked away from the world when I go there. I guess you could say I'm going for a rustic, Japanese, farmhouse kind of environment.

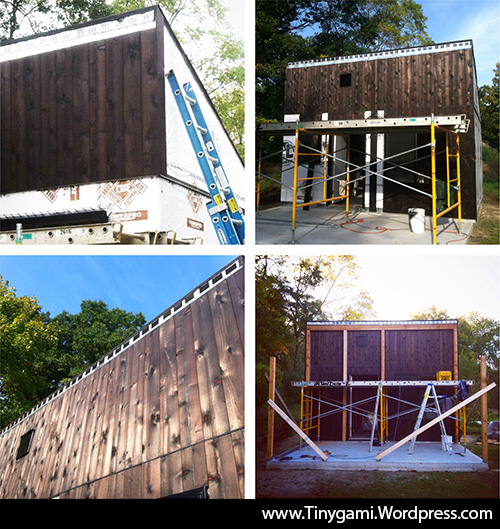
Since day one as I've driven around the Michigan countryside I've always been envious of the old barn wood I see on every highway I've traversed. How to get that look when I don't have an old barn to knock down and dismantle to upcycle those gorgeous weathered boards? Make them!

I sifted through a multitude of tutorials on Pinterest and came up with this:


Since I don't seem to be 100% back in the swing of blogging (the way I used to be) this tutorial is a little under-imaged but contains all the pertinent info you'll need to try this project yourself.

In a nut-shell I'd say it was both easy and fun. Since you're going for a worn and weathered look perfection isn't a requirement. It's more like a little slap it on, rub it around, wipe it off kind of  process that is quite forgiving as long as you remember to not create hard start and stop lines with the first coat of stain as they'll mark the wood with straight lines. In order not to do that I discovered two tricks:
  1. The main one I used on each coat was this: Apply the stain in short 2 foot sections (starting at the right end of the board and moving left) by dragging the foam applicator from right to left so that where the stroke ends you have long streak marks instead of a hard solid edge. When I applied stain to the next section I'd zig-zag the applicator a bit then do the same. I constantly went back to the far right end of each board and would draw the applicator down as far as the last section I'd just stained. This kept the application of the stain nice and even.
  2. On day two I did add a touch of mineral spirits to the foam applicator to apply the ebony which made the stain easier to apply. I don't know that I had to do this but didn't want to take any chances since the black-color was so dark.
Supplies:
  1. 29 Pine tongue and groove boards for each half of the ceiling. I purposely looked for the boards with knots, swirls, and patterns that were loaded with character. The "perfect" boards I used for the painted white boards or slipped them back into the pile at the lumber store.
  2. 1 coat of Minwax Jacobean oil-based stain applied with a 5" foam/sponge applicator and wiped off with a lint-free cloth. Allow to dry at least 24 hours until dry to touch.
  3. 1 coat of Minwax Ebony oil-based stain applied same as step 2.
  4. 1 coat of Minwax Classic Grey oil-based stain applied same as step 2.
  5. I will most likely be using Minwax Clear Brushing Lacquer in the satin finish as my finishing coat because I really want a crystal clear finish, not a topcoat that turns amber over time. ETA: I have now decided I will either leave the wood unfinished or use a finishing wax as I don't want a shiny surface to the boards. I'd prefer them to look raw and unfinished. Because there is no plumbing in the studio, and during the winter I'll run heat, and the summer AC I don't think humidity is going to be a problem as far as moisture damage to the ceiling. 
 Optional items I used for this project:
  • Rubber gloves. I got the chemical resistant kind at the hardware shop.
  • Foam applicators. I used 6 start to finish. The first color took 3 to, the second color took 2, and the final color only used 1. This was because the more stain that was already on the boards the easier it was to apply.
  • I used 2 lint-free rags total for wiping down the boards. I used the first one until it was so saturated with stain I had to start a second.
  • 3 stir sticks, one for each color of stain.
  • A breathing mask rated to filter out the stain fumes as I was working in a heated garage for 3-4 hours for each color/coat because it's winter.
  • Paint thinner to clean up.
  • I didn't until it was too late but I'd say to use lots of cardboard on the floor and at each end of the length of your boards to prevent splatters.
Optional ideas I read about but did not implement:
  • Sand all hard edges before you begin to create a more worn look.
  • Spot sand board edges between colors also to create a more worn and weathered.
  • Beat the boards with random heavy objects to dent and ding them then sand the dents and dings to make them look aged.
  • Use a combination of paint and stain to color your boards.
Some of the many pins I used for inspiration:

Build a Rustic Sofa Table & Make New Wood Look Old on PaperDaisyDesign.com
Wood feature wall on TheRaggedWren.Blogspot.com
MIXED WOOD WALL – EASY & CHEAP DIY on UncookieCutter.com
HOW TO MAKE NEW WOOD LOOK LIKE OLD DISTRESSED BARN BOARDS on RealityDayDream.com
DIY Plywood Plank Floors on CentsationalGirl.com

If you decide to try this and have any questions leave a comment or message me via my website! I'm happy to help if I can.

Oh, and these are the 29 painted white boards. They're primed then painted with one coat. The second coat will go on after installation. I'll admit I'm pretty excited to see them all go up!


This post was originally published on my work-only blog Tinygami.wordpress.com.
For lifestyle + origami updates this (I Found the Place) is the blog for you.

Monday, October 31, 2016

Happy Halloween!

Since Kitai passed away in 2014 I haven't had a reason to post a dog costume here on the blog...


Until this year :)

Meet Lenny! His owner contacted me to ask a question about how I made Kitai's pro-neuter "Mounds" costume. I replied and shortly after I was tagged in a post on Instagram featuring Lenny wearing his very own Mounds costume!


It warmed my heart and made me smile. Lenny's owner did an AWESOME job and even gave Kitai and I a shout out in his post and shared the link to Kitai's Pro-Shelter-Dog advocacy site www.CutestDogEver.com  that talks about special dogs like Kitai who are waiting for forever homes.


Kitai wore his costume to a black tie fundraiser at the shelter I adopted him from.


He even made it into the local news slideshow!

To see more pictures of Lenny in his costume visit his Instagram page www.Instagram.com/maltedlenny

Tuesday, October 25, 2016

Adding to my resume: Human Mousetrap

It was an ordinary day. I was about to make breakfast when I saw a tiny flash of grey go *hop, hop, hop* under the kitchen table. It was so fast I almost couldn't tell what it was but I knew it was a mouse, but not an ordinary mouse. It was a tiny, cute, little, adorable baby mouse with fur that looked as soft as a chinchilla and shiny shoe button eyes. As he scampered off to hide under a shelf is when I noticed the back screen door was ajar. Great.


When Fred came back inside for breakfast I said to him: There's a mouse in the house. His reponse? He laughed then acted as if I hadn't said anything. LOL. A while later he said he had some mouse traps, the snap kind that squishes them to death. I said no way, we weren't killing our baby mouse.

This is what I wanted. I had to run an errand that morning so I made two extra stops and a phone call looking for a humane Havahart Live Animal Trap. It turned out I could get a live trap sized for a rat, chipmunk, squirrel, rabbit, groundhog, opossum, skunk, raccoon, muskrat, beaver, fox and (I swear one looked to be) coyote sized but guess what's not available? The Extra Small MOUSE SIZED traps!


I came home emptyhanded. When Fred found out I had failed in my quest he got out the snap traps. The thing is they were so old one fell apart before he could set it up and another fell apart after he set it up which left one working snap trap. Fortunately, for George (my mouse), that only left one working trap. Fred set it up in the kitchen and went out to work on my studio.

I was sitting on the couch folding origami for ArtPrize so I took the extra piece of cheese (for the trap that fell apart) and set it in the center of the floor between the living room and dining room. I also grabbed the butterfly net I use to catch mosquitos when they make it inside. Then I waited and folded more frogs for ArtPrize. About an hour later... *Hop, hop, hop...* There he was!

He began to make a beeline for the cheese. I grabbed my butterfly net and chased him back and forth a good bit around the dining room. I tried to reassure him by repeatedly telling him I wasn't going to hurt him. Finally he zigged when he should have zagged and I was able to scoop him up in the net. Success!


I flipped the net over and took him outside to show him to Fred but before I made it out to the build site the mouse figured out how to crawl out of the net. I quickly lowered it to the ground so he wouldn't get injured because what's the point of saving his life inside only to let him die plunging 4 feet to his demise in the yard?


This is him high tailing it back to the meadow where he belongs. Literally! Look at how high his tail is! The picture is a little blurry because he was running really fast!

I figure out here in the country is where mice belong. No need to kill the little fella. There's plenty of room for all :D

Thursday, October 20, 2016

My CraftSanity podcast interview is now online!

On the third morning of ArtPrize I recorded a podcast interview with Jennifer Ackerman-Haywood from Craftsanity. This was following the blog post and video interview she recorded of me that I shared here a few weeks ago on the opening day of ArtPrize. In the Podcast we chat about my work, making art my full time career, ArtPrize, my move to the Midwest, the studio build, and how I can hold 150 itty bitty baby bunnies in my hand for her to help show just how tiny Tinygamis can be :D


My voice sounds a little tired and scratchy because I'd just spoken as much (possibly more) in the first two days of ArtPrize as I normally do in two months. You can hear the interview on SoundCloud by clicking the image below or CLICKING HERE. It's kind of long, almost an hour and a half. You don't have to listen to it all at once. Fred is going to listen to it in 30 (separate) 3 minute segments most likely over 30 days. For him, it will be like a mini-series. LOL


Jennifer, thank you so much for your interest in my work and taking time out of your busy schedule to come see my entry in person as well as follow up with two phone calls. I know I keep telling you this but I appreciate it so much.

After listening to my interview I continued to listen to more of your interviews the rest of the day and evening. They are wonderful! For anyone who has a passion to create things and/or wants to figure out how to make that passion a business, I can't recommend Jennifer's CraftSanity podcast channel enough. I am so inspired listening to so many stories all in one day. Now that I know about them I'll continue to go back into your archives and look forward to new interviews.

Looking forward to keeping in touch and so glad that ArtPrize (and our mutual friend Jon) brought us together. We will have to get together someday and fold some paper for real :)

Monday, October 17, 2016

How to hand bead a Swarovski crystal bridal veil

If you've been looking for a tutorial or instructions about how to DIY hand bead a wedding veil, you've found one!

Years ago I spent a decade as a couture bridal accessory designer. It will probably come as no surprise that even then I found ways of doing things that weren't standard. . . Which could translate to: I would figure out how to get the best result no matter how unorthodox, tedious, time consuming, or mind numbing the process turned out to be. LOL

Many thanks to photographers ©George Delgado and ©Maria Scaglione.

Here's the thing about hand beaded veils: It takes precision, patience, some intuitive layout skills and quite a bit of time but this is a project that many people can master if they don't mind putting in some practice BEFORE attempting to hand bead their bridal veil. I say before because the nylon tulle used to make veils is delicate, fragile and not forgiving in nature (it will stretch and tear) so you need to know exactly how to do this before you attempt to bead your finished veil.

Why hand sew the beads to the veil instead of using glue? The downsides of using glue:

  1. 1) It is all too easy to end up with globs of glue showing around your beads (whatever type you use) and if the bead rolls across the tulle before the glue sets you'll have streaks of glue criss crossing your veil.
  2. Glue is not going to preserve well over time. Most glues will yellow as they age so if you want your veil to become a family heirloom sewing is the better choice.
  3. Glue often comes off during cleaning so if your veil needs to be professionally cleaned after your wedding you run the risk of having them fall off at that time.

The oddest story I was told by a client was how once they were attending a wedding on a very hot day and the glued beads on the bride's veil loosened because of the heat from the sun and began rolling off the veil during the wedding!


With that said, what you will need are crystal beads. (You can also use pearls or glass beads.) These are my favorite Swarovksi Austrian Crystals to use for hand beading veils. The shape is called a bicone and the Swarovski style number is #5301. It's faceted like a diamond which helps to create nice, bright, sparkles when light reflects off of them.

Pictured here in three sizes 4mm, 5mm, and 6mm. I almost always used the 4mm exclusively on short veils, meaning from the fingertip up. Floor length veils I would sometimes use 5mm beads at the bottom of the veil where it drags on the ground and blend them into the 4mm to bead up to the top where the veil attaches to the comb.

Most popular colors for bridal veils are the clear crystals or the AB (which stands for aurora borealis) which have a rainbow shimmer to them that will cast off colored sparkles when the light hits them.

You can purchase Swarovski Crystal beads online or at some local bead shops.

Tip: Freshwater pearls are more tedious because their holes are drilled very, very small so it's hard to find a needle that will fit through them.


You can also use round crystals or beads. The round Swarovski crystals (style number #5000) are more expensive than the bicone shape and less reflective. Since I preferred the other bicone shape, I seldom used the round for hand beading onto veils.


To sew the crystals to the tulle I use this nylon transparent thread size .005 by Coats. The thread is similar to fishing line and is an "invisible" monofilament.


Here is a close up of the thread.


For sewing I use small needles. "Sharps" or "Quilting Betweens" are usually the perfect size. Their short length makes them just the right size and shape for hand beading.


And this is the nylon tulle close up. I will repeat again, do NOT practice doing this on your actual veil. Most fabric stores sell nylon tulle. It usually runs around $3 per yard. Buy a yard and use it to practice your technique until you can do this perfectly. Only then should you move on to your actual bridal veil.

The strands create a small diamond pattern. Your goal will be to sew each crystal to a single strand of tulle where to filaments X over each other.


To begin, thread the needle.


Now double knot the thread directly to the head of the needle making sure to tie one knot and the second knot directly over the first one, not to the needle itself. The thread is much thinner than the needles so the knots won't create any excess bulk.


Now take the tip of the needle and in a horizontal direction catch one strand of tulle right in the corner of a diamond so that you are intersecting where the tulle creates an X. This is crucial, you need to catch the strands where they cross and meet. If you sew the crystal to a single strand it will stretch and hang funny as the single strand cannot support the weight of the bead.


Now that the needle is through the tulle, drop a single crystal or bead onto the needle and let it slide down to the tulle. Find the cut long end of the thread and giving yourself about 2 to 3 inches, tie a knot. Make sure that you are tying the knot snugly, but not too tight. You're going to need to be able to shimmy the knot down towards the hole in the bead to conceal it.


See the double knot?


Now hold both loose ends of the thread and slide the knot up towards the hole in the bead. Take the short end of the thread (without the needle) and pull it back through the hole in the bead first. You can see the cut end of the thread coming out the other end of the hole above. Gently pull it all the way through.


Now slide the needle through the hole too so that both ends of the thread are coming out of the opposite end of the bead hole.

Click image to enlarge for Clarity

START: With two hands, and while on the same side of the hole as the knot, gently grasp the loose ends of the thread together in one hand and gently pull them which will cause the knot to shimmy along allowing you to ease the knot towards the hole running through the bead.

MOVE KNOT: When it gets to the edge of the hole, use the ends of the thread coming out of the oppposite side of the bead like in the photo above and give the two loose ends a gentle tug so that the knot pops into the center of the bead and is hidden from view.

FINISH: You only want the knot to go halfway into the bead so don't pull too hard.

Tip: Also don't pull too hard doing this as it can stretch out the tulle and the sharp edge on the hole of the bead can cut the thread. It takes a very gentle touch.


Use a small pair of craft or manicure scissors (manicure scissors are best) to trim the loose ends of thread away. Make sure the knot is not too close to the end you are trimming or the knot may release and the bead will fall off.


Voila! You have just hand sewn a crystal bead to a piece of tulle! Notice how clean it looks with no visible knot or cut ends of thread. Below are tips and tricks that may help you complete your hand beaded veil project.


Removing a Bead

If you need to remove a bead because you weren't able to tie it on properly (too loose or too tight or don't care for where you positioned it) the best method that worked for me was to use the tip of an x-acto knife blade and very carefully slide it between the bead and the thread, facing upwards and as close to the hole of the bead, not the tulle as possible so that you don't cut the tulle by accident. It's imperative to hold the bead and tulle in place and only slice through the thread. If you allow any tension to develop it will stretch the tulle and will leave a visible mark to the tulle once the bead is removed.

Beading Pattern


As far as where to sew the beads onto your veil, it works best to randomly scatter the beads around. It will look prettier and more ethereal than if you measure their placement exactly. If you use equal, perfectly measured, spacing the finished beading will appear as rows.

Beading a Blusher


If you are beading a blusher make sure you don't place the beads across the face. It's better to bead the second layer and keep the blusher free of beads as this will look odd in photos, especially if a bead is place directly over an eye or near the nose or mouth.

When Not to Bead

There are two instances when beading a veil may not really be worth the effort. They are:

1) When the wedding is during the daytime and outdoors. The crystals will be visible but will not "sparkle." Crystals need there to be low light and a light source to sparkle. When there is too much bright light hitting the crystal from all sides, you won't see it twinkle the same as you would at night time or in a darkened room.

2) Also, when your bridal gown is heavily beaded. The beading on your gown will sparkle and show through a single layer of tulle so if you are using a single layered short veil or floor length veil, and your gown is already heavily beaded, adding more beads to the veil won't enhance your gown and may even detract from it if the spacing and placement of your beads somehow conflicts with the design already incorporated into your gown.

Wednesday, October 12, 2016

A space of my own

I think it would be fair to say that most artists and crafters dream of having their own work studio. A space separate from their living area whether it's a room, the basement, or even better, completely detached from their home.


Well, that dream is becoming a reality for this origami artist. Earlier this summer the ground was broken (and graded) to accommodate the 16'x20' build site where I will have not only a work studio but a screened porch (to protect me from the mosquitos, noseeums, deer fly, and black flies) as well.


I am fortunate that some of Fred's friends (now my friends too) are helping Fred with the build. One has come with a tractor and back hoe, professional equipment to finish the concrete for the foundation, and his invaluable expertise. Oscar has made many long trips out to Greenville to burn and oil the wood siding. He will be a Shou Sugi Ban expert by the time he's done. Scratch that. He already is :) I cannot thank them each of them enough.

The walls went up...


And then the rafters and roof over the studio area...


The cedar boards and windows arrived. The cedar smells sooooooo good!

My favorite window is this one...


It's a 5' round window to evoke the "moon" windows and doors in Japan. The round shape is used as a frame to create a vignette through which a beautiful garden view can be enjoyed in all four seasons. It is going into the large square framed area below. Basically, I'll be sitting right in front of it almost level with the bottom of it because my work area will be on an 18" high platform which accomplishes two things:
  1. The platform will create storage space beneath it because storage space is hard to come by in the 8'x12' I've designated as my work area.
  2. Because even as I type this I am sitting on the couch as if I'm sitting on the floor, and because I even sit at the dining table in a chair as if I'm sitting on the floor (legs tucked beneath or in front of me) I decided to forego having chairs and simply install a dropped foot well in the platform, like in a Japanese restaurant tatami room. Then if I want to sit upright I can. Having a soft cushion to curl up or sit on instead of a chair will save a lot of space!

For the exterior we are using a Japanese wood preparation/preservation technique called Shou Sugi Ban (pronounced: show-sue-gē-bawn). Everywhere I've read about this technique (aka yakisugi) it is said the treatment leaves the wood fire, moisture, and insect resistant and the benefits can last as long as 85 years. The tung oil can be reapplied as needed to further protect the wood. Fred suggested using cedar shiplap siding vs tongue and groove as most of the tongue and groove is beveled on the side edge and wouldn't look flat like this.

The steps go like this:
  1. Burn board with a propane tank weed burner - Video on Instagram
  2. Scrubbing off the charred wood with a brush
  3. Rinse board with water
  4. Allow board to dry
  5. Brush board with tung oil and wipe with rag
  6. Allow oil to dry
  7. Repeat step 5
It is labor intensive but the results are beautiful. The burnt wood is dark brown and blackish when the sun isn't shining directly upon it. With direct sunlight the wood becomes almost metallic looking with a rich organic appearance as the oiled finish highlights the natural wood grain and knots.


Eventually the brown in the boards will fade to grey the way cedar naturally fades and the blackness will soften as the particles of soot still trapped in the wood grain weather off over time.


We opted to leave the porch posts, beams, and rafters unburnt to create contrast with the siding. I didn't want things too matchy-matchy.


Right now the warm red color of the cedar provides a sharp contrast. I'm looking forward to when it greys and the contrast isn't so pronounced.


To date everything I've made for ArtPrize the past three years has been made working at this 2'x3'coffee table in the living room with my supplies divided between two upstairs rooms and the basement. It is organized chaos. It will be so nice to have a formal workspace sometime next year :)


But even more important than having my dream studio come to life is that I've found a place (The Place) where my creativity isn't crushed or stifled because of my environment. Instead, or maybe I should say finally, it's been released in a torrent of ideas brought to fruition.

Above is the pair of Sandhill Cranes that nest in the marsh behind the property I live on. Sometimes they call to each other from the marsh before and as they leave in the morning. When I hear them I rush out to the back deck to watch them fly away for the day.


It took my whole life, many mistakes, self-reflection, learning how to let go of fear, and a giant leap of faith but I've finally found true happiness out here in this beautiful landscape I now call home :)


This post was originally published on my work blog Tinygami.wordpress.com.
For lifestyle + origami updates this (I Found the Place) is the blog for you.

Friday, September 23, 2016

Miniature origami art at ArtPrize8

I have to say, even though I am completely uncomfortable having a photo taken or video shot (of me) I was really glad I was able to be interviewed by Jennifer Ackerman-Haywood of the CraftSanity blog on the very first day of ArtPrize8. You can see my entry both on her blog and in the Youtube video she's posted there. CLICK HERE to visit the CraftSanity blog post :)

I promise, I will post more about my entry very soon. First I just have to make it through the first weekend of the event. If you're in or near Grand Rapids, MI I hope you can stop by the Grand Central Market and Deli (map) to take a peek at my entry titled "Tinygami". It's located at 57 Monroe Center, NW in downtown Grand Rapids. The event runs from September 21 - October 9, 2016.

Friday, July 29, 2016

It's been awhile. . . Again

Hi! I hope you've been well and enjoying a good spring and summer.

I just realized the last post I wrote was March 3, 2016. Even as my posting here on the blog slowed, I was more regularly posting on Instagram and less so on the Tinygami Facebook page. Then everything just seemed to grind to a halt. A couple of reasons why:

1. I've been really busy
2. I'm still searching for my blogging mojo

The busy part will be explained in future blog posts. Possible titles are listed below:

  • The 6000 mile road trip (Alternatively: I'm sorry I didn't tell you I was in town)
  • My Happy Place
  • ArtPrize 2016
  • Another tiny trailer gathering
  • I am down in the dirt
  • Solving the mystery of the German Apple Pancake (Recipe)
  • My reading list
  • Things are complicated in my head
  • Why is Mother Nature testing me?

The mojo part is a bit trickier. Things still happen on a fairly constant basis that I want to write about, but for some reason, I don't. One of the most striking things about the current non-blogging-me and the old consistent-blogger-me is that when things happen I've noticed I no longer have the desire to grab my camera and take a picture.

Like the other day when an injured woodchuck was sitting in a bush whose branches seemed so fragile it was almost like it was levitating. In the old days a floating woodchuck defying gravity would have been a for sure kind of Kodak moment. This time the urge just wasn't there. Though in my defense I was honestly more concerned with figuring out how to help it than to blog about it. That might be a good thing. In the end (despite my best efforts and a small fear of rabies) I didn't do either, help or photograph it. It either ran or painfully drug itself away (when I wasn't looking) before I could trap it to take it to a wildlife rehabilitation center I found online :(

For now I thought I'd write a post just to get me back on track. Perhaps I'll work my way down the list. Or, if you have strong feelings and curiosity about one of the aforementioned post titles, leave me a comment and I'll try to bump that one to the top if it you aren't already the most curious about the 6000 mile road trip.

And because I know people enjoy pictures. . . Here is a giant snapping turtle I photographed last summer that lives across the road from me. It was probably close to 20" in length. Why it was up on the grate I have no idea. While not nearly as magical as the floating woodchuck it was something you don't see every day. So, I did snap this picture just before it slid off and swam away. Here you go:


Thursday, March 3, 2016

Kintsugi Heart

Are you familiar with Kintsugi? It's a Japanese technique used to mend broken pottery. The belief is that when mended with gold the broken object becomes more beautiful and valuable than it was before. How can you not love that?

My miniature origami Kintsugi Heart on Instagram

There's even a song about kintsugi. I heard it performed by a woman (I'm sorry I don't recall who she was but she sang it beautifully) on Prairie Home Companion one quiet weekend. A Google search to learn more about it followed which is when I discovered Peter Mayer is the folk singer-songwriter who wrote and recorded the song. The video below was made by a fan and includes many images of kintsugi in case you've never seen it before.


Japanese Bowl

I’m like one of those Japanese bowls
That were made long ago
I have some cracks in me
They have been filled with gold

That’s what they used back then
When they had a bowl to mend
It did not hide the cracks
It made them shine instead

So now every old scar shows
From every time I broke
And anyone’s eyes can see
I’m not what I used to be

But in a collector’s mind
All of these jagged lines
Make me more beautiful
And worth a much higher price

I’m like one of those Japanese bowls
I was made long ago
I have some cracks you can see
See how they shine of gold

The concept of brokenness, healing, and scars that are to be appreciated with reverence instead of being ashamed of them all resonated incredibly deeply for me.

The brokenness is unavoidable. It's as much as part of life as birth and death.

The song stuck in my head for months. Then one day an idea came to me but it's taken until now to begin to bring it to fruition. At first I thought I would paint a heart, my heart, and add a gold fracture line for each time it has been broken and healed. Some cracks would be larger and longer than others. But the more I thought about it the more I realized I couldn't begin to remember exactly how many times my heart has broken not only for myself but for others as well (from people I know to people I read about online and in the news each day).

And so I did this instead and posted it on Instagram a couple of days ago...


If we live life well, if we not only feel the pain but learn from it and evolve because of it, we become like kintsugi. The scars of mended gold only add to the beauty of the broken pottery. My heart has been broken so many times, in so many ways, for so many years, by so many different people I've lost count of the shattered pieces. Yours too? But it has mended (again) and my creativity is surging. My emotional scars are why I practice gratitude, compassion, and patience. I'm feeling like someone I used to know #origami #origamiinmyhand #kintsugi #heart #emotions #growth #survivor #strength #healing #japanese #art #craft #mini"

If any of this makes sense to you I hope the next time your heart breaks instead of becoming bitter or cynical you'll think of kintsugi and you'll be able to take comfort in knowing that to suffer through pain and loss isn't for nothing. It's always an opportunity to learn more about acceptance and gratitude which both help to create balance in our lives. I definitely believe that while suffering loss is never enjoyable it has helped to make me a more strong, resilient, tenacious, appreciative, and empathetic person. I take comfort in knowing (once I'm able to come out the other side) there will always be a new and improved kintsugi version of me :)

Monday, February 22, 2016

Origami Update

Here's what been happening over on Tinygami's Instagram Feed: Rabbits and Bunny Boxes!

Sunday, February 14, 2016

Doublegami Valentine's Day Cranes


It's an origami heart, inside an origami crane.

A month ago I was looking at a piece of cellophane that had come wrapped around a Christmas gift. Before tossing it in the trash I cut a square out and tried folding an origami crane. It worked!

Immediately I wondered "What can I put inside the hollow that forms its body?" I don't think it took a full minute to realize with Valentine's Day just around the corner I would try to make heart filled origami cranes. This pair consists of 1" high cranes filled with 1/2" folded hearts.

I LOVE THEM! I'll be working with this concept even further. I have (what I think is) a great idea. Will keep you posted.

Until then celebrate love!

Thursday, February 4, 2016

How to sew a DIY trailer awning

From the moment I first laid eyes on an old school rope and pole awning I knew I had to have one for The Glampette, once she was designed and built :)

I looked at dozens of pictures online and realized there seems to be one woman who is the go-to person for custom awnings within the tiny and vintage travel trailer communities. Her name is Marti and her company is called Marti's Vintage Trailer Awnings.

But, if you have a heavy duty sewing machine, plenty of can-do spirit (basically more gumption than (even) know-how) you can also make your own awning just like I did!


I've actually made two awnings now. The fancy one is made of canvas and has a domed shape to it which will help to divert rain in inclement weather. It also gives me standing room beneath the awning and I added velcro along the edges so that I could hang mosquito net walls when bugs are a problem. Which can be surprisingly often! The mesh can be made of classic mosquito net or noseeum mesh which has even smaller holes to keep out the tiniest of blood-sucking insects.

BTW I think the first time I realized that making a teeny-tiny domed awning was within the realm of possibilities was when I saw this thread by member Doug Hodder on the Teardrops & Tiny Travel Trailers forum. If you're considering a tiny travel trailer the website is an endless resource of ideas, feedback, suggestions, tips, and future friends!


My other awning is a very simple, lightweight, sun/shade design made of an old printed cotton tablecloth that matched The Glampette's yellow fenders.

Let me begin by saying: I AM NOT A SEAMSTRESS! So even though I made a tutorial (and a successful awning or two) there are very possibly definitely things that could have been done in more efficient/professional ways. Also, I'd appreciate your help if you spot any errors in the tutorial. Please leave a comment or contact me so that I can fix or clarify them :)


This is how the awnings attach to the side of the trailer. It's called an awning rail (I ordered mine online from Vintage Trailer Supply) that consists of a single channel that your fabric covered rope or welting slides into to hold the awning in place.

Directly above the awning rail you'll notice a black rubber rain gutter that Fred had the foresight to add above my rear door to keep rain water from dripping straight down and into the trailer. It works VERY well.


The awning took a single day to make. Collecting all of the components took months. LOL

Here is an overview illustration of what the awning consists of (before adding the velcro).
  1. Outdoor canvas fabric
  2. Two fiberglass tent poles that I carefully and slowly trimmed down (with a tiny hacksaw) repeatedly to find the correct fit for the awning to dome properly
  3. Two grommets to drop over two metal tent poles to help secure the awning in place
  4. Rope or welting
  5. I used heavier duty outdoor thread to help prevent damage and wear from being exposed to inclement weather
  6. A heavy-duty sewing machine as I'd need to sew through multiple layers of canvas
  7. Four corner pockets for the fiberglass tent poles to fit into (they are held in place by tension)
  8. A fabric reinforced center with two pieces of velcro sewn into place to secure the tent poles where they cross over
  9. The awning is hemmed on three sides
  10. The fourth side is edged with the fabric covered rope to slide into the awning rail
PLEASE NOTE: The illustrations below are not all to scale. Certain details I've exaggerated simply to make it easier for you to see what is happening. I've also used different color fabrics for the corner pockets, awning, and velcro to make it easier to distinguish between them. In practice you will want to use matching-color fabric and components whenever possible.


This is an overview of the pattern for the grommet corners. Below you can see each step laid out separately. They are not to scale. I made them of equal sizes to allow for close-up detail views.


My hems are 3/4" so I needed a seam allowance of 1.5" for my awning. The overview above allows you to press and pin your hems into place so it's easier to slip in the finished corner pockets once they're ready.


A photo of the corner pocket at work! You can see where the tent pole slides into the reinforced fabric pocket. The velcro (hooks) attached to the awning is tan while the velcro (loops) attached to the mesh is black.


TENT POLE POCKETS
  1. Begin with a rectangle and fold the corners towards the center to create a triangle
  2. Fold the triangle in half to create a smaller triangle that consists of four layers of fabric
  3. Close up detail of how to position the triangle before stitching together
  4. Stitch pattern. Do not make the tent pole pockets too narrow (side to side). You will want/need some extra room to allow for easier insertion of the tent poles.


Here are close ups of how to add the tent pole pockets to the awning.

STEP 1

  • Lay the corner pocket just within the seam allowances
  • Be sure to reinforce the two marked seams with thread that matches your canvas sewing the pocket directly to the awning fabric.
  • The third side I left unattached and found it worked just fine.


4. Refold hem over the tent pole corner pocket.


5. Stitch along the hem to secure the corner pocket in place.


6. I added the added the additional reinforced stitching (shown in green) to help reinforce the contact point with the end of the tent pole as this is where the most pressure will be applied from the poles pushing against the fabric.


7. I will make a separate tutorial in the future regarding the bug walls but for now here's a quick overview of how I sewed 1.5" velcro (hook side) to the underside of the awning over the hem.


On the mesh side I sewed the corresponding velcro loops so when the mesh is in storage it doesn't get caught and snagged on the velcro hooks.


8. Next I used an X-acto knife to remove the layers of fabric and velcro for the grommet. I bought the largest ones I could find but they have turned out to not be heavy duty enough so I will have to find some with longer shafts that can go through 7 layers of (thin) canvas and one layer of velcro.


9. With finished grommet in place.


10. Here is a close up photo of the actual grommet. See how it's bending along the right side? Eventually it will pop off.

The next time I set it up I'll take the time to make a tutorial that shows how the grommets, tent poles, guy lines, and stakes work to help stabilize the awning.


11. A close up of the actual center reinforced fabric and velcro used to secure the tent poles where they cross over. The square of fabric is four layers thick.


Rope and Pole Casing

Here are close up photos of the front and back of the rope side of the awning. It is constructed differently than the grommet end. I had to notch the fabric to be able to encase the rope within the fabric to slide into the awning rail.

Because I didn't have any rope on hand but did have some fabric trim I used it which is why there is an additional edge to the cord. The other awning I made was with a single length of rope I got at my local hardware store. Definitely test the tension before sewing your awning. If your rope isn't thick enough you can add more layers of fabric until it is.


1. Measure the width of your cord x4 to determine how much fabric you'll need to create the casing then double the measurement as shown above. My canvas was very thin so I needed four layers to make it thick enough to fit the rail snugly.

Fold in half.

I didn't finish the cut edge at all because I needed it to remain thing enough to fit into the awning rail. I was thinking I should get some kind of glue that stops fraying but decided it isn't necessary simply because I use the awning so infrequently.


2. Now lay your rope against the lower upper half of the folded over casing (just above the half-way mark) and fold again as pictured above.


3. Now that your rope is encased in the fabric use a zipper foot and stitch as close to the rope as possible. The nice thing about double folding the fabric is now the edge above the rope is a folded edge and not raw edges so I didn't have to do any additional sewing to finish it.


This is what the finished section should look like. Except I would leave additional cord coming off each side. On windy days your awning can blow through the rail if it's not a tight enough fit. I've found taking that extra bit of cording allows me to draw it back under the rail and I can pin it in place with a straight pin to help better secure the awning when needed.


I hope this tutorial is helpful to you! I wish it was better but I am not a seamstress so most of what I did was to try something, then try it again, and again until I got each step just right. If you have any sewing background at all I'm sure you'll put together something much more polished in probably less than half the time it took me to make mine!

Wishing you happy sewing and travels!


If you'd like to learn more about The Glampette check out this blog post and tv interview where she made her first (well, and only) studio appearance.