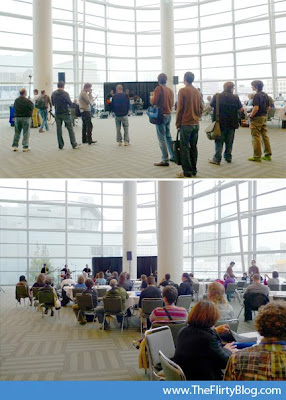
This was only the second time I've attended
Macworld in downtown San Francisco, CA. This time was more unique than the first though because it was a double date: Carl Mindling and his wife Kim attended with my geeky hubby and I.
Held each year at the Mosocne Center, it's a total geekfest!
If you pre-registered online and printed your access badge at home you could walk in the front doors and stroll straight into the show.
If you didn't print your badge at home there was a huge station where you could do so upon arrival. There was no line while we were there but during peak attendance why would you want to wait and register onsite?
If you knew me four years ago when I attended the unveiling of the first iPhone you may remember my shock and outrage at being charged $8.25 for a mediocre egg salad sandwich on wheat. In the big scheme of things, the fact that the sandwiches this year were only 25¢ more was impressive. I thought with inflation the sandwiches would have been well over $9 by now. LOL
Having not learned my lesson well enough four years ago, I forgot to eat breakfast and was hungry when we arrived so I opted for this economical but overpriced $1.75 banana. It was a freakishly large banana so I didn't feel too ripped off, until we went to the Starbucks next door after the show and I saw their bananas were only $1.00 each. Geesh, listen to me say "only $1.00" for a banana. Um, I bet at Safeway one banana is like 29¢.
So, the whole reason I decided to attend Macworld was to see our friend Jonathan Mann performing at noon on the second floor. You may know Jonathan as the Song-a-Day guy who wrote and performed the famous "
iPhone Antennae Song" and "
That's Just The Woz." We met Jonathan at Woz's "6.0" Birthday party last year and have have been friends ever since.
The Audience
Jonathan and his group,
The Rock Cookie Bottom, played for 45 minutes including his biggest hits and some of the new songs he wrote this past week in honor of Macworld including "A Brief History of Macworld" and "Fans of Apple"
The lower picture above was pretty funny to me. Jonathan dedicated a song to the one and only
John Gruber from
Daring Fireball (a technology blog) and
The Talk Show (a weekly podcast).
I was trying to inconspicuously take a picture of John Gruber taking pictures of Jonathan performing but the last shot I took he looked directly over at the audience so it looks like he's looking at me. But I'm sure he wasn't. He was just looking in the general direction in which I happened to be sitting. Or maybe he saw me and thought "Why is that creepy girl taking pictures of me?" LOL
After watching the show we decided as a group to have lunch before viewing the exhibit hall... separately. Because my hubby has a very limited range of foods he enjoys he wanted to eat at the food court in the San Francisco Center Shopping Mall while Carl, Kim and I wanted to eat something nicer... So hubby went to the mall and we walked across the street to the
Samovar Tea Lounge.
I had a Grilled Agor Cheese with Pesto and Sundried Tomato on a Whole-wheat Ciabatta sandwich. Carl had quiche and Kim had a curry plate that smelled so good the people who came in and sat down beside us were practically leaning over our table saying very conspicuously "I wonder what she's having" so that we would tell them what Kim was having. I think hubby had a hamburger over in the food court. The price for my delicious sandwich with salad and a sliced apple was $11. That's right, only $3.50 more than the refrigerator case sandwich back at the Moscone Center. The meal was light, healthy and filling. I couldn't even finish all of my salad.

Each time I go to Samovar I usually try a new tea. This was, sadly, the first tea I didn't like and more so because I wanted to like it most of all. I went all out and ordered a cup of authentic, top of the line, Hekisui matcha tea. It's powdered tea that is hand whisked with only 4 oz of water. It had an interesting creamy feel to it as I drank that I did enjoy but the flavor was very strong. In retrospect I should have simply asked for more hot water to add to it but I'm pretty sure that would have been very gauche. Like going to a fine restaurant and asking for ketchup to smother an elegant meal with because you didn't like the flavor of the food.
Tomorrow I will do a post about stopping by a gorgeous Looff carousel on our way back to Macworld. This is a sneak peek of one of the photos I took.
Edited to Add: CLICK HERE to the View Post
Arriving back at Moscone Center I just had to show my badge and I was in!
There are many types of booths and demonstrations going on including two stages with various presentations. The top photo was where live podcasts and project spotlights were featured. The stage below featured the Berklee College of Music using computer software to do something with music...
There are lots of booths. Most are really fancy with huge signs. The HyperJuice booth even had a lounge area behind the colorful banners if you wanted to sit and take a break.
I loved the presentation of the dexim booth. I felt like I was walking into a website...
One of the coolest devices I saw was their
P-Flip solar phone charger
. Yup, just pop it open, place it in the sun and it will charge.
A demonstration I found particularly interesting was by Dragon, known for their computer program Dragon
Naturally Speaking
. Their voice recognition/dictation software for both
Mac and
PC converts the words you speak into digital text on your computer. I watched part of the
Dragon Dictate
presentation.
Not only can you use the Dragon software for business purposes, perhaps even more meaningful is that people who suffer from hand, arm or spinal injuries and conditions that makes typing difficult or impossible can use their software to be able to operate a computer.
Dragon Dictate
not only enables you to "type" on your computer, it also gives you the ability to launch and use applications by voice command. Dragon Dictate for Mac allows users to launch and use applications like Mail, iChat, iCal, TextEdit, Pages, Safari and more. Very cool!
While I doubt I will ever have a need for a waterproof "Dry Case" for my iphone, the display at their booth cracked me up. They put an iPhone into a Dry Case sleeve and submerged it in a tank with goldfish. I kept waiting for a fish to swim by the front of the tank (for a more dramatic photo) but they seemed to like hanging out behind the phone more than in front of it. Basically the sleeve protects your device at the pool, beach or lake, while still allowing you to use it (with a waterproof headphone and mic jack) to play music, chat on your phone and take underwater photos with your camera.
When I went in 2007 there were a ton of companies selling skins (protective cases) for ipods and iphones. This year there were a few but not too many. There were also quite a few iPad stand booths in case you want to convert your iPad into a vertical display screen at work, home or wherever you happen to be.
But the coolest thing I saw was the
Photosimilie 5000 3D product animation lightbox. Say what? At a glance it looks like a huge, curving, futuristic, microwave oven. But it's fully automated and takes perfect images and creates flawless, 360º product animations. From the Ortery Company Website:
"Photosimile 5000 makes it easy to create professional still photos, 360-degree, hemispherical and full spherical product animations."
Software controls every aspect of Photosimile 5000 from proper lighting, picture taking, camera movement, camera settings, turntable movement and image processing. Everything works in unison controlled from one program that automates and simplifies all of the workflows involved in generating professional photography results.
Oooooh I'd love to have one of these for some of my blog photos. LOL I'm so low tech I don't think I could go any lower. I use a piece of white poster board combined with a little Photoshop to blow out the background to bright white to shoot the "light box" effect photos you see here on my blog. And with the Photosimilie 5000
retailing at $22,000 on the B&H website, I'll be sticking with my poster board solution for the foreseeable future. Though I keep meaning to upgrade to a piece of white linoleum. Yeah, that'll be a great upgrade :)
There are all kinds of phone, music player and computer accessories at Macworld. From iPhone options to keyboard covers... The only thing missing was an idea I had a few years ago. I'm posting it here in case any developers see potential to expand upon it within the multi-billion dollar, burgeoning pet accessory market... Modeling my iPod leash/portable music player for dogs is the cutest dog ever,
my dog Kitai. I call him the "cutest dog ever" because his shelter dog advocacy website url just happen to be
www.CutestDogEver.com.
BOL! (Bark Out Loud)
And I loved this. Great marketing. As you leave the building you see this huge poster with the dates for the 2012
Macworld. That's right, mark them down, January 26th, 27th and 28th 2012.
I'd have to say that since Apple Inc. decided to no longer participate in Macworld the number of exhibitors in the Expo Hall has diminished significantly and imo if you live out of town, I don't think it's compelling enough to hop on a plane, book a hotel and fly out here unless you're planning on purchasing a lot of stuff using the show discounts in the Expo Hall. If you are considering coming from out of town to attend Macworld I think it would only be worth it if you are planning on upgrading your registration to attend the Super Sessions, Users Conference, Pre-Conference workshops, MacIT® Conference or Industry Forum.
It is a fun experience though and if you're a Mac fan it's a great way to spend an afternoon. Thanks to Jonathan Mann for the invite to attend. You rocked your performance!
Going to check out your song for today right now...


